> For the complete documentation index, see [llms.txt](https://docs.empe.io/llms.txt). Markdown versions of documentation pages are available by appending `.md` to page URLs; this page is available as [Markdown](https://docs.empe.io/develop/intro/verifying-credentials.md).
# Verifying Credentials
This page walks you through verifying credentials with a deployed **Verifier**: creating an OpenID4VP presentation request (as a URI or a scannable QR code), tracking the verification session live, and verifying an SD-JWT or JWT-VC credential directly.
Every request below targets your Verifier deployment's base URL (for example, `https://example-name-verifier.evdi.app`) and must include a valid Bearer token in the `Authorization` header. In local development you can set `AUTH_DISABLED=true` to skip authentication. The full, interactive API reference is always available at `/api-docs`.
***
## Creating a Request from the Console
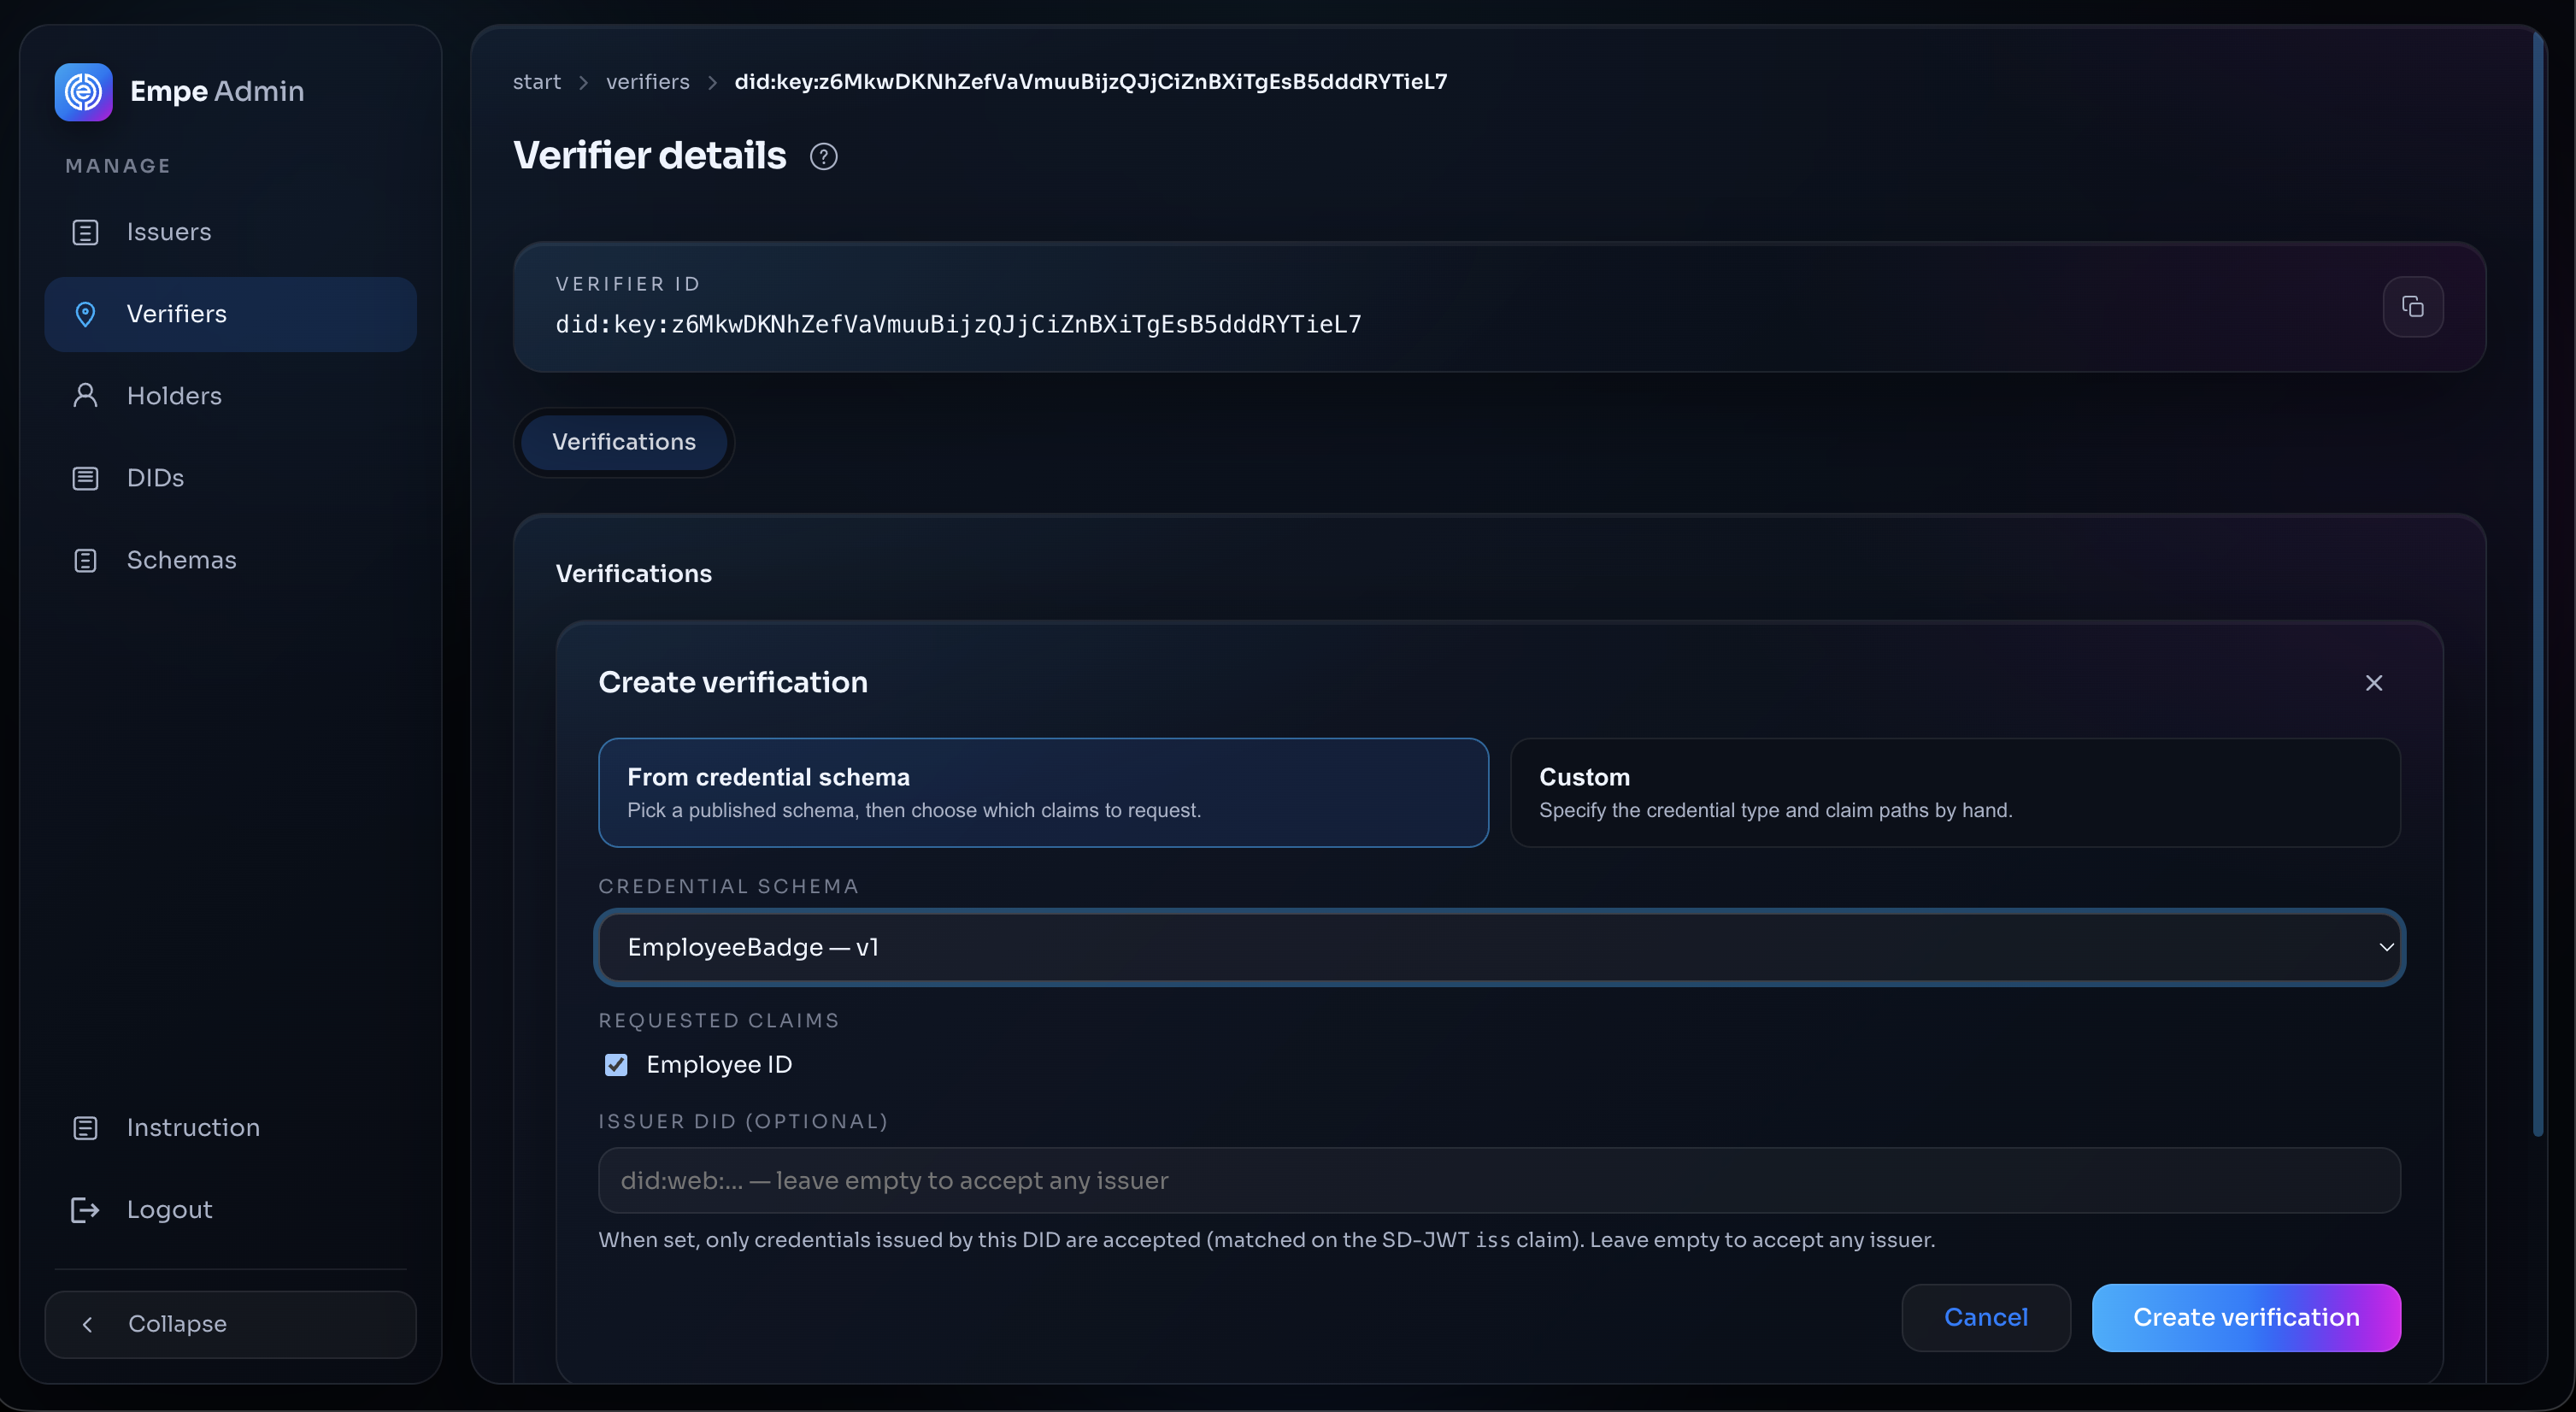
You can create a presentation request without writing any code. On the Verifier's detail page, open the **Verifications** tab and click **Create verification**.
1. Choose **From credential schema** to pick a published schema and tick the claims to request, or **Custom** to specify the credential type and claim paths by hand.
2. Optionally set an **Issuer DID**. When set, only credentials issued by that DID are accepted (matched on the SD-JWT `iss` claim); leave it empty to accept any issuer.
3. Click **Create verification**.
The Create verification form — pick a published schema and the claims to request
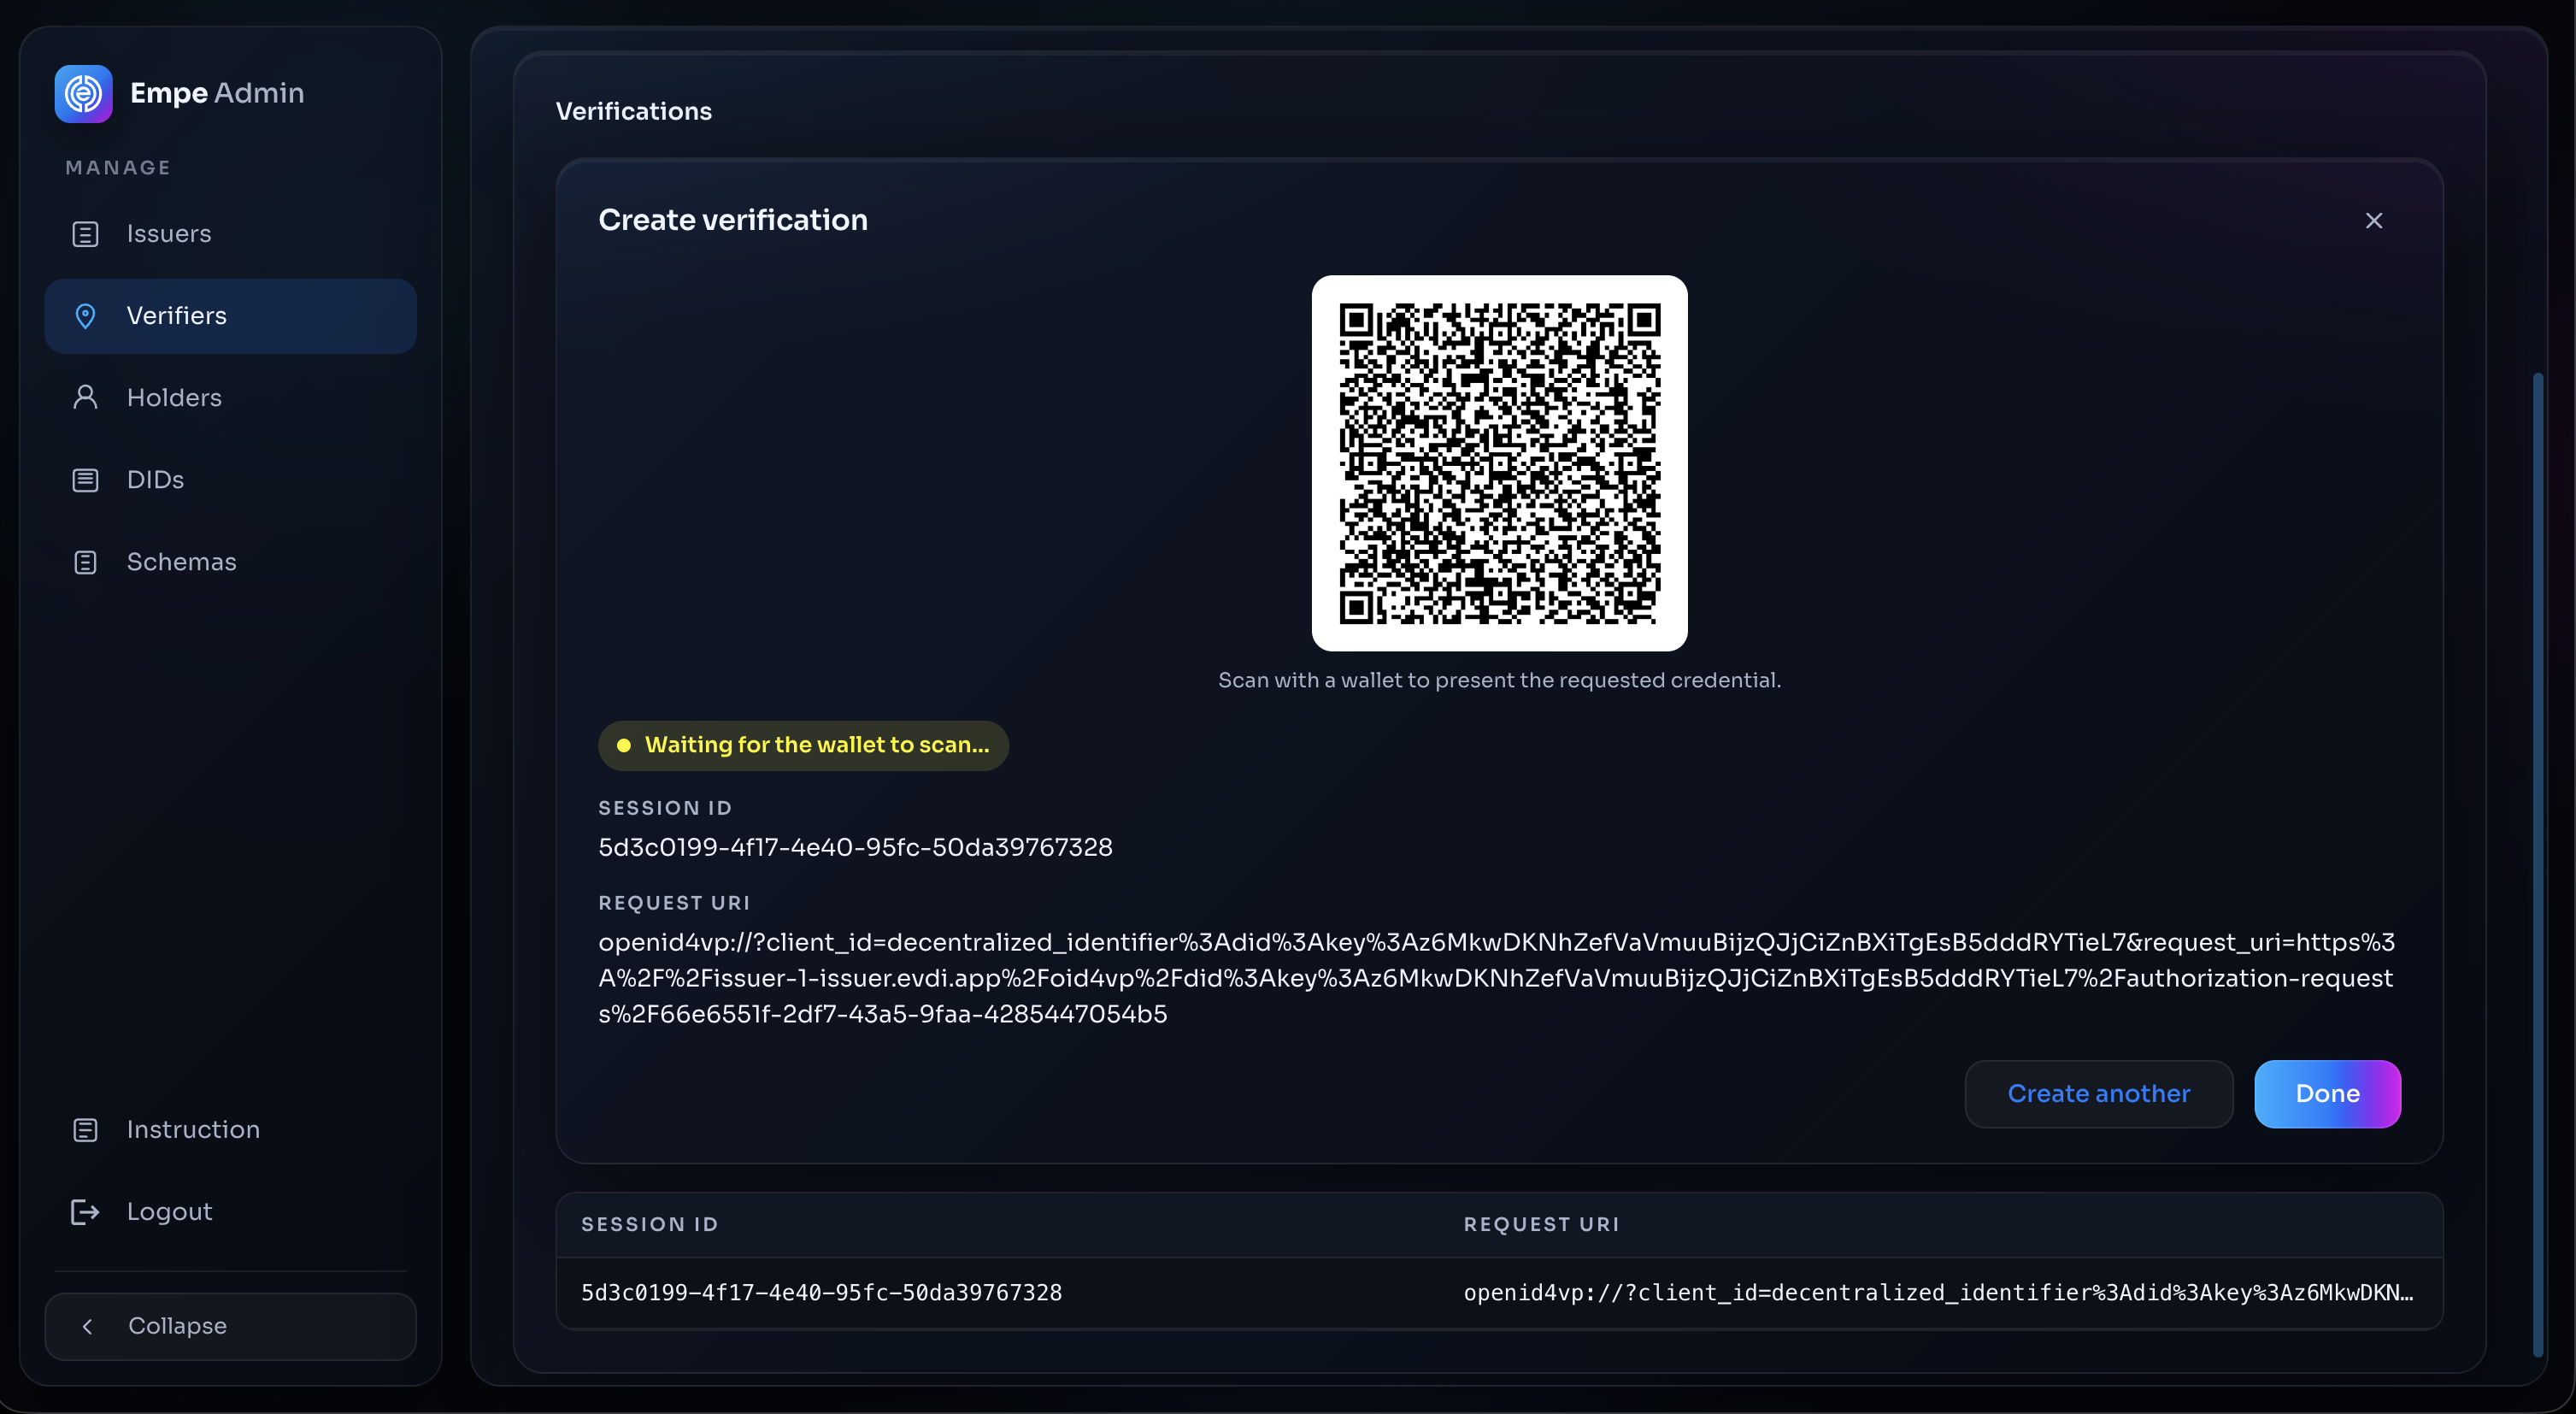
The console renders the request as a QR code alongside its **Session ID** and **Request URI**, and tracks the session live while it waits for a wallet to scan.
The verification request as a QR code, with the session waiting for the wallet to scan
The rest of this page covers the same flow through the API.
***
## Creating a Presentation Request
A presentation request asks a wallet to present one or more credentials. Create one against the Verifier you deployed earlier.
1. Pick the Verifier you want to use and note its identifier (`verifierId`). This is the value shown on the Verifier detail page.
2. Decide **which credentials to request**. Provide **exactly one** of:
* `dcqlQuery` — a DCQL query, or
* `presentationDefinition` — a DIF Presentation Exchange v2 definition.
3. Send the request to **`POST /verifiers/{verifierId}/authorization-requests`**.
4. Share the returned `authorizationRequestUri` with the wallet, or use the QR-code endpoint described below.
### Request Body
* **dcqlQuery** *(object, optional)*: A DCQL query describing the requested credentials. Required if `presentationDefinition` is not provided.
* **presentationDefinition** *(object, optional)*: A DIF Presentation Exchange v2 definition. Required if `dcqlQuery` is not provided.
* **responseMode** *(string, optional)*: One of `direct_post`, `direct_post.jwt`, `dc_api`, `dc_api.jwt`. Defaults to `direct_post.jwt`.
* **version** *(string, optional)*: OpenID4VP version to use — `v1`, `v1.draft21`, or `v1.draft24`. Defaults to `v1`.
* **expectedOrigins** *(string\[], optional)*: Expected origins for Digital Credentials API flows.
* **authorizationResponseRedirectUri** *(string, optional)*: Redirect URI to include in the authorization response.
* **signingDid** *(string, optional)*: DID that signs the request. If omitted, the `verifierId` path parameter must already be a DID.
> **Note:** `presentationDefinition` requires `"version": "v1.draft24"` (or `v1.draft21`); the default `v1` supports only `dcqlQuery`.
Example body requesting an `EmployeeBadge@1:sd-jwt` credential via DCQL:
```json
{
"dcqlQuery": {
"credentials": [
{
"id": "employee_badge",
"format": "dc+sd-jwt",
"meta": { "vct_values": ["https://example-name.evdi.app/vct/employee-badge"] },
"claims": [
{ "path": ["full_name"] },
{ "path": ["department"] }
]
}
]
},
"responseMode": "direct_post.jwt",
"version": "v1"
}
```
### Response Body
* **authorizationRequestUri** *(string)*: The `openid4vp://` request URI to hand to a wallet.
* **verificationSessionId** *(string)*: The session identifier used to track this verification.
* **authorizationRequestId** *(string, optional)*: Identifier of the hosted request, when applicable.
* **expiresAt** *(string, optional)*: ISO timestamp after which the request is no longer valid.
```json
{
"authorizationRequestUri": "openid4vp://?request_uri=...",
"verificationSessionId": "18b760b1-4ab8-4d38-9d42-6b4c25a4d2e0",
"authorizationRequestId": "1b8a6a8b-2ac1-4f0b-9d9c-6b9c859b1af2",
"expiresAt": "2024-08-09T12:34:56.789Z"
}
```
***
## Showing the Request as a QR Code
To present the request to a mobile wallet, request a ready-made QR image instead of building one yourself.
1. Send the **same body** as above to **`POST /verifiers/{verifierId}/authorization-requests/qr-code`**.
2. The response is a **PNG image** of the QR code, encoding the `openid4vp://` request URI.
3. Read the accompanying response headers to keep tracking the session:
* **X-Authorization-Request-Uri** — the same request URI encoded in the image.
* **X-Verification-Session-Id** — the session id to poll or stream.
* **X-Authorization-Request-Id** — present for hosted requests.
Display the image to the user, who scans it with their wallet to begin presenting their credentials.
***
## Tracking the Verification Session
After the request is created, follow its progress in real time as the wallet responds.
### Read the current state
Call **`GET /verification-sessions/{sessionId}`** to fetch a snapshot of the session.
* **id** *(string)*: Internal session identifier.
* **verifierId** *(string)*: The Verifier that created the session.
* **state** *(string)*: Current lifecycle state, for example `RequestCreated`.
* **authorizationRequestUri** *(string, optional)*: The request URI for this session.
* **authorizationRequestId** *(string, optional)*: Hosted request identifier, when applicable.
* **authorizationResponseRedirectUri** *(string, optional)*: Redirect URI supplied during request creation.
* **expiresAt** *(string, optional)*: ISO expiry timestamp.
* **errorMessage** *(string, optional)*: The last error observed in the session lifecycle.
```json
{
"id": "18b760b1-4ab8-4d38-9d42-6b4c25a4d2e0",
"verifierId": "did:web:example-name-verifier.evdi.app:646941a4-1d89-60e7-d66e-6afddccb7a68",
"state": "RequestCreated",
"authorizationRequestUri": "openid4vp://?request_uri=...",
"authorizationRequestId": "1b8a6a8b-2ac1-4f0b-9d9c-6b9c859b1af2",
"authorizationResponseRedirectUri": "https://your-app.example.com/callback",
"expiresAt": "2024-08-09T12:34:56.789Z"
}
```
### Stream live updates
For a live view, subscribe to **`GET /verification-sessions/{sessionId}/events`**, a Server-Sent Events (SSE) stream.
* The stream emits a **`session`** event each time the session changes; its payload is the session object shown above.
* A **`ping`** heartbeat is emitted every 15 seconds to keep the connection alive.
Watch the `state` field move through the lifecycle until the wallet's presentation has been received and checked. If verification fails, the `errorMessage` field describes what went wrong.
***
## Verifying a Credential Directly
You can also verify a single credential on its own, without running a presentation request — useful when a credential string has already been collected. SD-JWT VC and JWT-VC are both supported; the format is detected automatically.
1. Send the compact credential string to **`POST /credentials/verify`**.
2. Inspect `isValid` in the response. When valid, the decoded contents are returned for inspection.
### Request Body
* **credential** *(string)*: The compact credential to verify, in JWT or SD-JWT form.
```json
{
"credential": "eyJhbGciOiJFZERTQSJ9.eyJ2Y3QiOi...~WyJhIiwiZnVsbF9uYW1lIl0~"
}
```
### Response Body
* **isValid** *(boolean)*: Whether the credential passed verification.
* **format** *(string, optional)*: Detected format — `dc+sd-jwt` for SD-JWT credentials or `jwt_vc` for JWT-VC credentials.
* **payload** *(object, optional)*: The decoded credential payload.
* **prettyClaims** *(object, optional)*: For SD-JWT, all disclosed claims merged into a single object.
* **error** *(string, optional)*: The reason the credential was rejected, present only when `isValid` is `false`.
```json
{
"isValid": true,
"format": "dc+sd-jwt",
"payload": { "vct": "https://example-name.evdi.app/vct/employee-badge", "iss": "did:web:example-name.evdi.app:..." },
"prettyClaims": {
"employee_id": "E-10293",
"full_name": "Jane Doe",
"department": "Engineering"
}
}
```
When a credential cannot be verified, `isValid` is `false` and `error` explains why:
```json
{
"isValid": false,
"error": "Invalid signature."
}
```
---
# Agent Instructions
This documentation is published with GitBook. GitBook is the documentation platform designed so that both humans and AI agents can read, navigate, and reason over technical content effectively. Learn more at gitbook.com.
## Querying This Documentation
If you need additional information that is not directly available in this page, you can query the documentation by asking a question.
Perform an HTTP GET request on the following URL with the `ask` and `goal` query parameters:
```
GET https://docs.empe.io/develop/intro/verifying-credentials.md?ask=&goal=
```
`ask` is the immediate question: it should be specific, self-contained, and written in natural language.
`goal` is what the user is ultimately trying to achieve, the reason they need the answer. Sharing it helps GitBook give you a better, more relevant answer. A goal is most helpful when it describes the outcome the user wants rather than restating the question. For example, with `ask=how do I create an API token`, a goal like `automate deployments from our CI pipeline` lets GitBook tailor the answer to that use case.
The response will contain a direct answer to the question and relevant excerpts and sources from the documentation.
Use this mechanism when the answer is not explicitly present in the current page, you need clarification or additional context, or you want to retrieve related documentation sections.